
Big Image Sizes
Large image sizes should be scaled down and/or cropped to 590w x 400h. Height is more flexible, but for consistency try to crop large images to 590 pixels wide. Image quality should be set to “High”, and/or 80% of original. File size for large photos should be less than 100K. All photos should be JPEG files. Text, illustrations, logos, charts/graphs should generally be .gif files.
Featured Image (Thumbnail) Sizes
 Thumbnails should be 150×150 pixels. To control which image from a post appears within the “list view” on the homepage or post category archive pages, choose “set featured image” from the “Featured Image” box located along the right-sidebar within the Admin view.
If you don’t like how WP crops an image, you can create your own and upload it independently.
Always choose an image from the Media Library if it already exists. For example, no need to upload another AJS photo, if the same one is already in the library.
You will not be able to create a “featured image” thumbnail from linked photos…only photos that are within the WordPress Media Library (you have to upload a photo for WP to “crunch” it to the right size).
Editing Images

Be sure to give the images alt descriptions, and descriptive titles. The title shouldn’t be the file name (.jpg)…but should make it easy to read when you are browsing/searching a list of images. Good: Andrew Szeri Thumbnail Ivy. Bad: DSC_2344-ajs.jpg.
Preventing Text from Wrapping Around an Image
Solve this pesky issue by inserting a div class called “clear” following the section containing the image.
Title Tags
The H3 element automatically clears text/images around it and inserts a line break. You should separate sections of a post using H3 title tags.
Copying and Pasting
If you are copying and pasting from Word, it’s a good idea to either paste into the HTML screen editor screen, paste into Notepad/Textedit first, and carefully inspect the code of what you pasted. If you see “mso” code or lots of “span” tags, you need to clean them up.
Use Existing Styles
Try not to create custom colors or text styles, this adds unnecessary code to the pages. Simply choose from P, H1-H6 for you text styles. Bolds and italics are fine.
Creating a “Line” to Separate Content/Sections
This common need can be accomplished by either using an empty H3 tag, or by inserting the following in the “Text” code view: <div class=”line”></div>. Note, the H3 tag includes a visible line when formatting text with it.
Links
When linking to a page on grad.berkeley.edu, do not open in a new browser window. For all other links, open in an external window. Text links should be made on descriptive language. Examples…
Good: Find out more by visiting the Career Center website.
Bad: Visit the Career Center on the web.
Baddest: Click here to learn more from the Career Center website.
Badd Too: Find out more by going here http://careers.berkeley.edu.
Equally Not Good: More information is available from the Career Center website.
Creating & Editing a Post
Make the permalink short and unique. It doesn’t have to be very descriptive. Good: profiles/rob-johnson/. Bad: profiles/the-life-and-times-of-rob-johnson/.
Always include an excerpt. This should be 1-2 sentences long, and usually just the first couple of lines of the article.
Do not allow comments.
Use existing categories. Only create new categories when adding a new eGrad edition.
Only use existing Tags when possible. New tags should be either a department name (case sensitive), a broad topic that ties-together similar articles, but not too generalized (Good: Sustainability. Bad: Graduate.)
Embed Videos (or other interactive content)
All you need to do to embed something into a post or page is to post the URL to it into your content area. Make sure that the URL is on its own line and not hyperlinked (clickable when viewing the post).
For example:
Check out this cool video:
https://www.youtube.com/watch?v=dQw4w9WgXcQ
That was a cool video.
WordPress will automatically turn that into a YouTube embed when the post is viewed.
Depending on the source (Vimeo, Flickr, etc.), there might be different embed methods. See the WordPress site for more tips: http://codex.wordpress.org/Embeds.
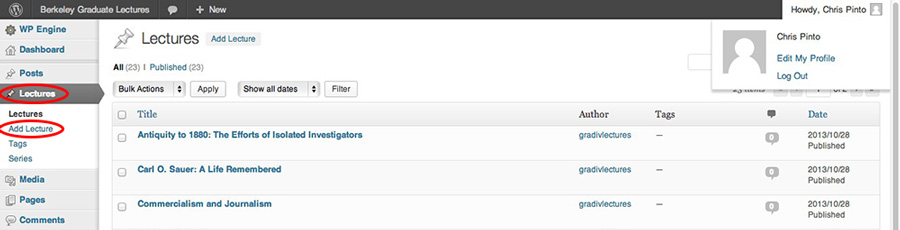
Adding/editing a New Lecture
If you’d like to add a new lecture to the site, please follow the instructions and photos below:
1. In the Editor view, click on the “Lectures” link in the sidebar, then on “Add Lecture” to add a new lecture. If you are editing an existing lecture, locate the lecture you would like to update and click the edit button.
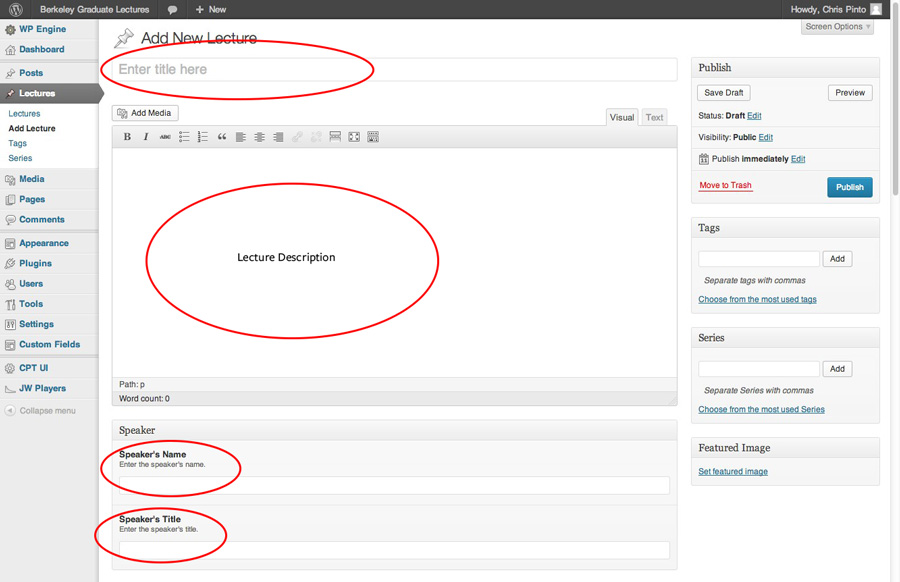
2. Add the Lecture title, description (which should be the information about the lecture and the speaker) and the Speaker’s name and title.
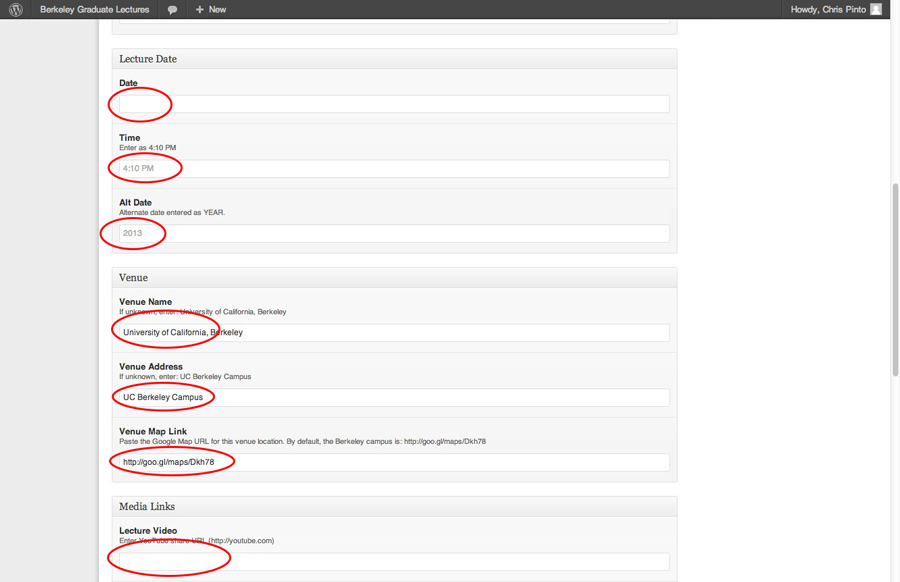
3. Add the lecture date, time and alt date (the year the lecture took place), the lecture venue information including the name, address and a Google Map link. If the lecture has links for a video of the lecture, an interview or an mp3 audio clip of the lecture, add those links as well.
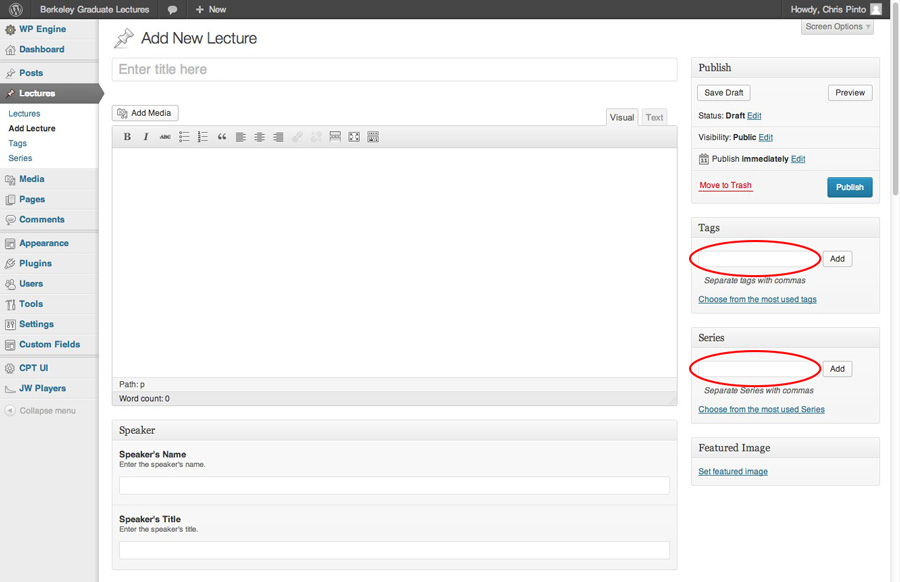
4. Add appropriate tags for the lecture, as well as the name of the series the lecture is part of (in most situations you can choose from a series that has already been added to the site by clicking the “Choose from the most used Series” link.
5. Add an image to be displayed with the lecture, such as a poster or headshot of the speaker by clicking the “Set featured image” link. You can either upload a photo from your computer that is not currently in the Media Gallery, or select an image that is already in the Media Gallery after clicking the “Set featured image” link.
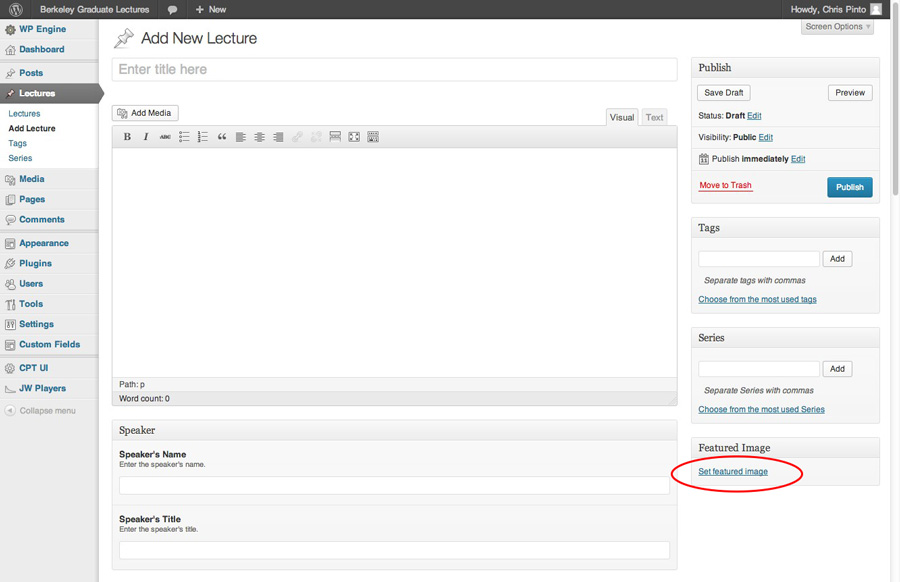
6. Click “Publish” in order to finish adding the lecture to the site, if you do not press publish, all of the added information will be lost if you navigate away from the page. You may also save as a draft.
